Pages

Showing posts with label photoshop. Show all posts

Monday, 27 January 2014

Creating a Simple Terrain in 3DS Max - Part 2: Creating the Material

In part one of this tutorial, we created a simple terrain using a height map. In this part, we will create a material that changes depending on the height of the terrain.

The material we will use creates a blend of 2 existing materials found in the 3dsmax material library, although it could be used to blend any materials.

Open your terrain scene from part 1 of the tutorial and load the 3dsmax material library. In the material editor create a blend material by clicking get material and start typing the word blend in the browser.

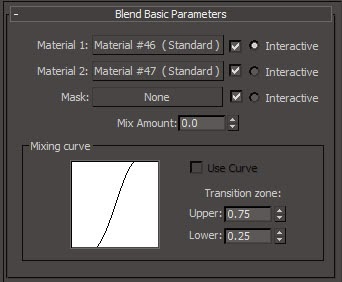
The blend material has 3 basic settings; 2 materials and a mask that creates the blend.

Apply the Ground_Grass to the material 1 slot and Ground_Grey_Dirt2 to the material 2 slot by dragging them from the browser onto the map buttons.

Apply the height map to the mask slot by clicking the button, selecting bitmap and navigating to your height map image.

Apply the blend material to your terrain and render the scene.


The terrain should now have grassy textures at the base and rocky textures higher up. You may notice that the textures are far too big for the terrain, so we need to modify the grass and dirt materials.

Depending on your height map, you may find that you have too much rock and not enough grass (or the other way around). You change the balance of the blend by activating the mixing curve and changing the settings. Try different settings until you are happy with the results.
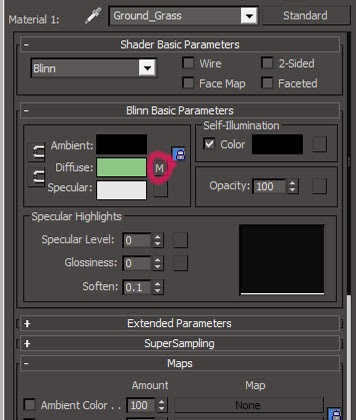
In the blend material, click on the material 1 map button (Ground_Grass), then click on the diffuse map button for the grass material.

In the coordinates box, change the tiling settings to 5 x 5 and render the scene.

You will notice that the grass texture is now much smaller. You may also notice a repeating pattern in the grass.

Try changing the tiling settings to get a result you are happy with (remember that the tiling pattern is only really noticeable when viewed from a distance). I settled on 3 x 3, but yours may vary.

Once you are happy with the settings, try the same techniques to modify the dirt texture.

Creating a Simple Terrain in 3DS Max - Part 1: Creating the terrain


The following technique uses a height map to tell 3DS Max which parts of the object are higher than the others.

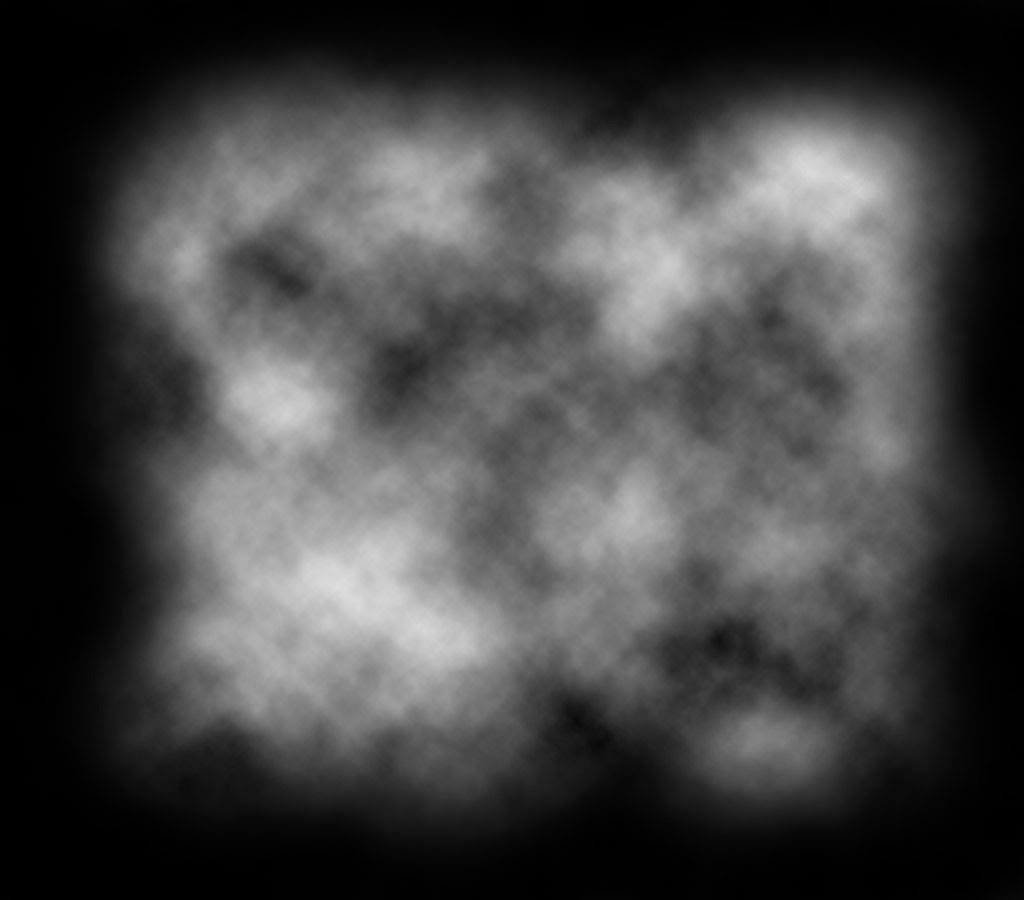
A height map is a black and white image where black is the lowest part of the map and white is the highest.

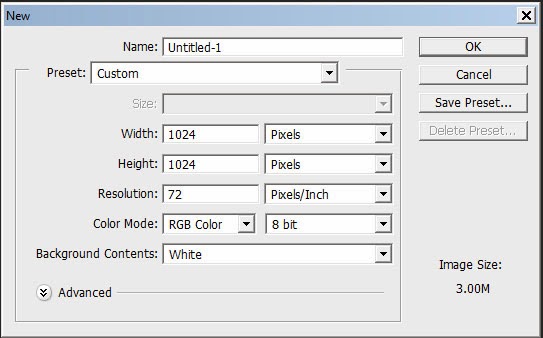
To create the height map, open Photoshop and make a new image at 1024x x 1024 pixels (File > New... or Ctrl + N).

Fill the background with black and create a new layer (Layer > New > Layer... or Ctrl + Shift + N).

The new layer will contain the information for our height map. It is tempting to try and paint your terrain manually, but this will usually look too synthetic and have sharp edges (think of Mario 64). To make our landscape look random, we are going to use the clouds filter.

Make sure your foreground is set to white and your background to black, then apply the clouds filter (Filter > Render > Clouds).

As you will see the filter produces totally random results. Try re-applying the filter a few times to see the variations it can make.

Save your image as a JPEG file (3DS Max will recognize PSD files, but they are usually quite big).

Open 3DS Max and create a plane in the top view (Create > Standard Primitives > Plane). Set the length and width to 100 and the segments to 50 x 50.

In the viewport, turn edged faces on to see the individual polys that have been created.

This will give us enough geometry to create some detail without over burdening the system (this type of map can be quite processor-intensive).

The more segments the plane has, the more retailed the terrain will be. We may need to increase this later, but avoid the temptation to use too many segments as this is likely to crash the system.

Next, we will apply a displace modifier to the plane (Modifiers > Parametric Deformers > Displace)

You will not notice any immediate change to the shape of the plane because we've not told the software what shape the displacement will be or the strength of the displacement.

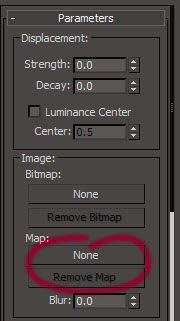
The shape of the displacement will come from the height map we created earlier.. To apply it, click on the Map button in the Image section of the modifier's properties. Select Bitmap from the list of maps and navigate to where you saved your height map.

Again, you will not see a difference in the shape of the plane because we have not set the strength of the modifier.

Change the strength to 10 in the modifier properties (just above where you set the map). Your plane should now start to resemble a section of terrain.

Try changing the strength to see how it effects the terrain. Try to avoid extremes as it will start to look unnatural (unless you are trying to make the surface of the asteroid in the film Armageddon).

Now we have a terrain that has realistically random bumps, but the edges stop abruptly and spoil the scene. To edit the shape of the terrain, all we need to do is edit the image.

Open the height map image in Photoshop and select a very large soft brush (I am using 300px wide, 0% hardness). Use the brush to paint a rough black edge on the image.

Save the image and go back to 3DS Max. If you have saved over your original height map using the same file name, you should see that the scene has updated to reflect the changes.

If not, reapply the map by clicking in the map button of the displace modifier properties.

Try rendering the scene. You should have a realistic terrain which can be easily modified by editing the image map.

If the terrain looks a little blocky, you could try changing the segments of the plane (but try not to overdo it).

Thursday, 3 October 2013

Creating Images for Print and for the Web

When creating or looking for digital images, it is very important to know how the image is going to be used. If an image is going to be displayed on a website, it is generally going to be shown at 72 pixels per inch (ppi). But if the image is going to be used in print media, the typical resolution is 300 dots per inch (dpi)*.

The means that image that 360 pixels wide will be 5 inches wide on a web page, but will only be 1.2 inches wide when added to a print document.


A 360 pixel image added to a 10 inch canvas @ 72ppi takes up approximately 25% of the canvas

The same image added to a 10 inch canvas @ 300dpi appears much smaller

Although the image is the same size (360 x 360 pixels) the resolution of the canvas has an obvious effect on the image. If we were to scale the image up, it would become pixelated and this would look unprofessional.

Therefore, we need to ensure that we work with the correct sized images from the outset and bear in mind that if the image is to be used in print media, we will need much higher resolution images.

---
*When describing screen density, we use pixels per inch (ppi). and when measuring print density we use dots per inch (dpi). However the terms are often interchangeable and may be used to refer to both. Although it is possible to measure density in pixels or dots per centimetre, the industry standard is inches. 

Thursday, 21 October 2010

Rasters Vs Vectors

Raster images are made of a series of pixels arranged into a grid. Each pixel has colour and brightness information.


Photoshop logo JPEG and zoomed in section showing individual pixels


Raster images can display a wide range of colours and are ideal for photographic images. However when a raster image is enlarged the pixels become bigger and more obvious. This causes edges to become jagged, especially curves.


Vector images are created using sets of co-ordinates joined by lines. This means that the image can be enlarged by moving the points without affecting the quality of the line


Cartoon created in Adobe Illustrator and zoomed in section at 2400%, the line is still sharp


Vector images are very useful for creating line art such as the above cartoon and for logos and icons. However, they are limited when trying to display graduated shades of colour.


 Sunset image as a jpeg compared to a vectorised version created in Illustrator

For more information on vectors and rasters, have a look at this video from vector.tutsplus.com.